CATEGORY; OTHERS - CLOTHING
DIFFERENT WAYS TO TIE A GOOD TIE.
THE BOW TIE
Bow ties are available in the same ranges of colours and patterns as the classic tie. Generally black, a bow tie is worn with black evening dress and a white shirt with a “broken” collar.
It can also be worn more casually with a suit and a shirt with a wide-spaced collar.
Below are the following steps on how it's done.
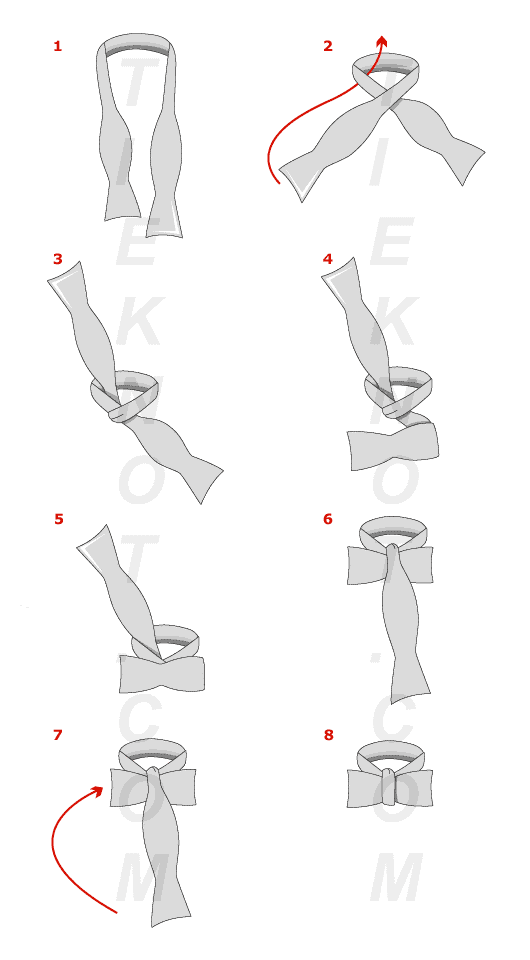
Tying the Bow Tie:
Step 1: Adjust the tie to have one end lower than the other.
Step 2: Around your neck, lay the longer end over the shorter end.
Step 3: Slide the lower end up and under the bow.
Steps 4 and 5: Make the two butterfly wings by folding the shorter end horizontally.
Step 6: Fold the wider end over the front of the knot being formed.
Step 7: Then hide the longer end under the folded part.
Step 8: Finally, adjust the knot by pulling gently on both bows.
In theory, when finished, the ends of the two bows should align with the pupils of your eyes.
THE SMALL KNOT
As its name clearly indicates, this is a small knot.
Its great advantage is its use with heavy fabrics and/or with close-cut collars. Do not use it on collars that are long or wide-spaced.
Easy to do, even with its 180° twist, the Small Knot is by far the easiest of all the knots.
Below are the following steps on how it's done.
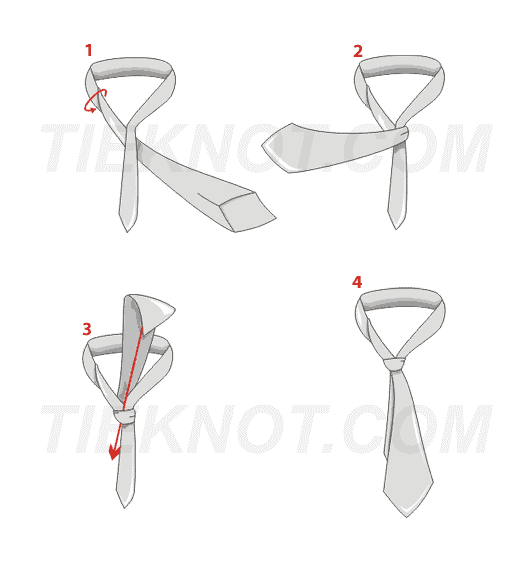
Preparation:
Put the tie in place around your neck, then twist the wide end 180° (see illustration above). To avoid doing the twistyou can simply place your tie around your neck back to front. The wide end needs to be longer than the narrow end.
Tying the Small Knot in 4 steps:
Step 1: Under the collar, lay the wide end over the narrow end.
Step 2: Now run the wide end over the layover.
Step 3: Hold the layover with one hand and run the wide end behind the layover and up. Smooth out the wide end and slide it down through the loop of the layover.
Step 4: Adjust the knot, sliding it up to your collar.
For a smart finish the knot must cover the top button of your shirt and the narrow end must be completely hidden.
THE HALF WINDSOR
The Half Windsor is similar to the Full Windsor although slightly less bulky, and easier to do. It is ideal for lightweight or not too thick fabrics.
This elegant triangular knot works well with shirts with a classic collar or an open-collar.
Below are the following steps on how it's done.
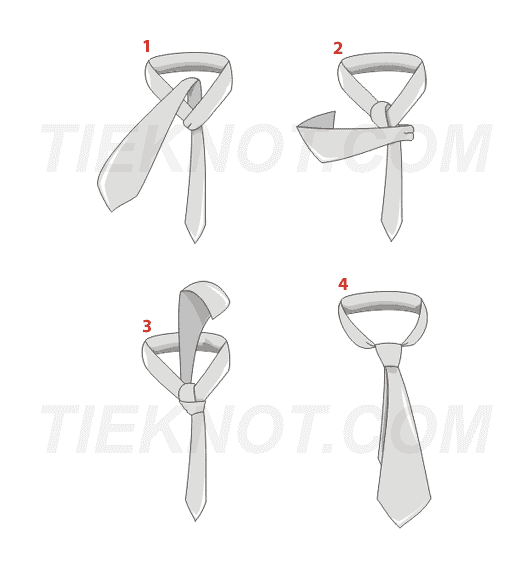
Preparation: Place the tie around your neck. Medium-sized men should start with the narrow end well below the belt.
Tying the Half Windsor in 4 steps:
Step 1: Lay the wide end over the narrow end. Hold this layover and make a second turn around the narrow end just above the first.
Step 2: Take the wide end horizontally behind the layover and bring it forward.
Step 3: Hold the layover, take the wide end up under the layover and slide it down through the loop.
Step 4: Hold the narrow end and pull gently on the wide end to form the knot. When finished, the narrow end should be concealed behind the wide end, which should be level with your belt.
THE WINDSOR KNOT
The Windsor Knot is the knot for special occasions. Typically English, it owes its name to the Duke of Windsor who made it popular.
As the finished knot has considerable volume it is preferable to restrict its use to wide-spaced collars such as Italian collars or Windsor collars.
This knot is complicated to form. It has to fit exactly between the two ends of the collar and must completely hide the top button of the shirt.
Below are the following steps on how it's done.
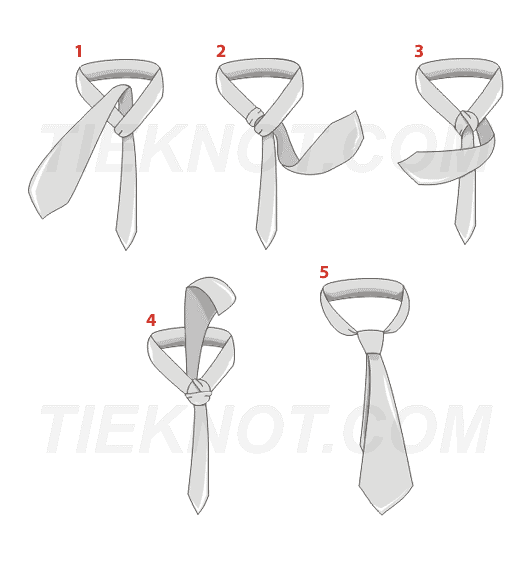
Preparation: Slide the tie around your neck after first having buttoned up the top button of your shirt and turned up the collar. The two ends of the tie must be of different lengths. The wide end must hang down much longer than the narrow end.
The steps:
Step 1: Lay the wide end over the narrow end.
Step 2: Bring the wide end up through the gap between the layover and your neck.
Step 3: Take the wide end to the right behind the layover, then forwards and up, then down into the gap between the layover and your neck.
Step 4: Take the wide end round the front of the layover, up close to your neck, and down through the loop just formed.
Step 5: Hold the narrow end and tighten the finished knot by pulling it gently up to centre it on your collar.
THE DOUBLE KNOT
The Double Knot is very similar to the Four-in-Hand. It has just one more layover. At the beginning the wide end is turned twice over the narrow end.
The slightly thicker finished knot makes it ideal for use with most shirts. It is also perfect with all types of tie, with the exception of very thick fabrics.
Below are the following steps on how it's done.
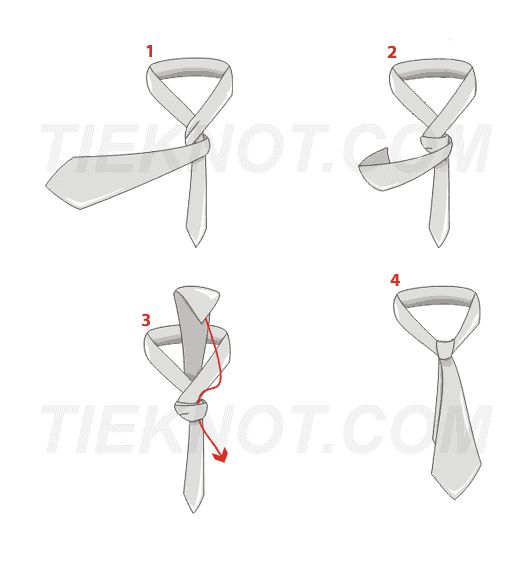
Preparation: Slide the tie around your neck after first having buttoned up the top button of your shirt and turned up the collar.
The two ends of the tie must be of different lengths. The wide end must hang down much further than the narrow end.
Tying the Double Knot in 4 steps:
Step 1: Just below the collar, lay the wide end over the narrow end (see steps 1 to 3 of the Simple Knot).
Step 2: Take the wide end behind the narrow end a second time.
Step 3: Bring the wide end up and under the layover and then into the loop formed by the first or second layer.
Step 4: Finally, adjust the knot and slide it up to the centre of your collar.
Hope this was helpful and do have a nice day.
This article was first posted in TieKnot.com
Follow us on Twitter - @akatechsolution / @smartdevicess /@ewang_hb
Leave a Comment
"Making the simple complicated is commonplace; making the complicated simple, awesomely simple, that's creativity"
- Charles Mingus


