CATEGORY; WEB / IT - COMPUTER
HOW TO TAKE A SCREEN-SHOT USING A COMPUTER WITH EITHER WINDOWS 7, 8, 8.1 AND 10.
People at times find it difficult to take a screen-shot on different windows and others gadgets.
The picture above as you can see is a simple screen-shot taken from a Microsoft surface pro 3.
FIRST HOW TO TAKE A SCREEN-SHOT IN A WINDOWS 7 COMPUTER.
To take a screen-shot on a windows 7 computer you are to first open the "Paint Program".
First you are to click the "Start" windows and type in "Paint" in the search bar provide for as seen in the pictures below.
You should follow the red arrow in the pictures below for better understanding.

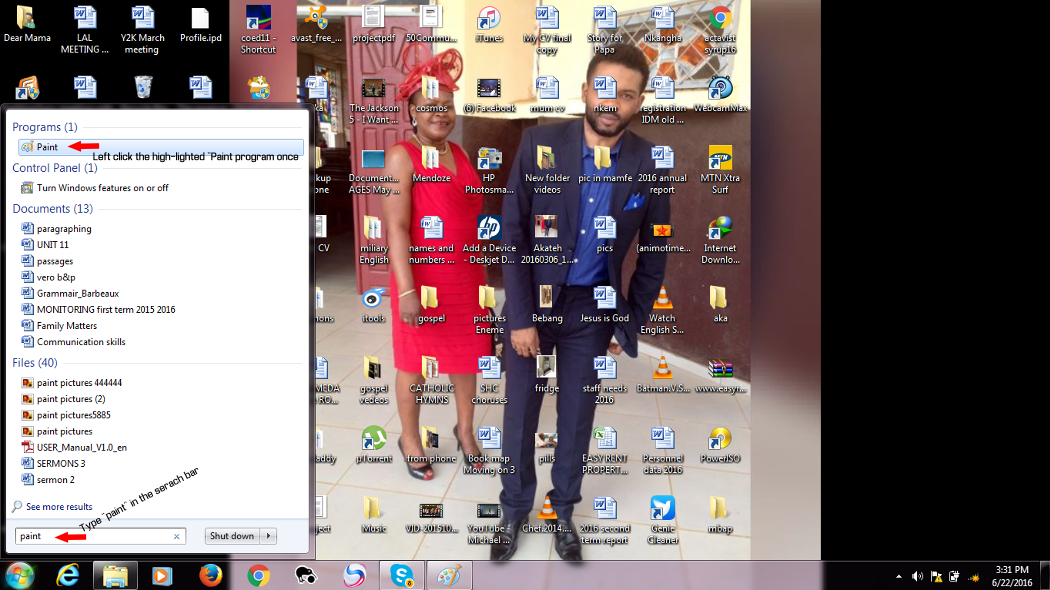
After opening the "paint program" minimize it and allow the desktop format or display you wish to take a screen-shot of.

When the Paint program is open

When the Paint program is minimize
In other to take the screen-shot now you are to follow the steps below,
1. First you are to press the "fn" key and hold still with one finger.
2. And then press the "prt sc" key to take the screen-shot.
So the combination of "fn" key + "prt sc" key automatically takes a screen-shots of your computer screen desktop. The screen-shot is then copied and then you could now paste it in your Paint program which has already been open.
You are just to maximize the "paint program" and then paste as seen below.
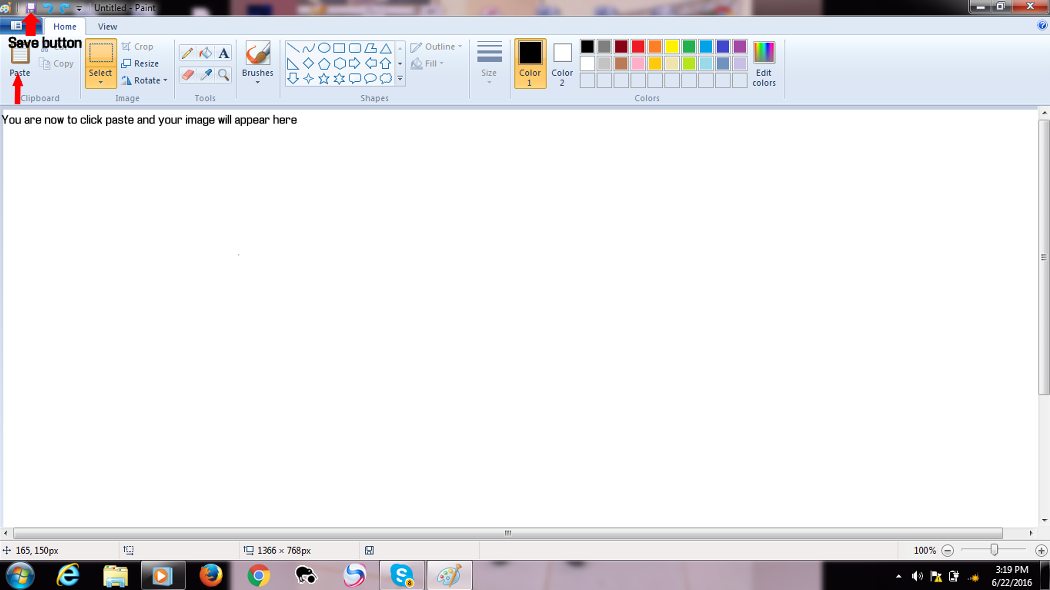
After doing the above instructions you could crop it or do whatever you want to do with the picture in the "paint program".
After editing the picture to your satisfaction you can save it to the folder you could easily get access to.
HOW TO TAKE A SCREEN-SHOT ON A PC USING OR OPERATING WITH WINDOWS 8 OR 8.1.
Modern computers like hp, Accer, and other brands from 2013 are being simplified for our understanding.
So taken a screen-shot here doesn't require you to open any program.
You are just to press the following keys as seen below.
Put a finger on the “windows” keys first and then press the key title “prt sc” with another finger all together.
That is the “Windows key + prt sc key” and you can immediately take a screen-shot.
The screen-shot images are automatically store in the Images or photos folder in your pc as seen below. Follow the red arrow.
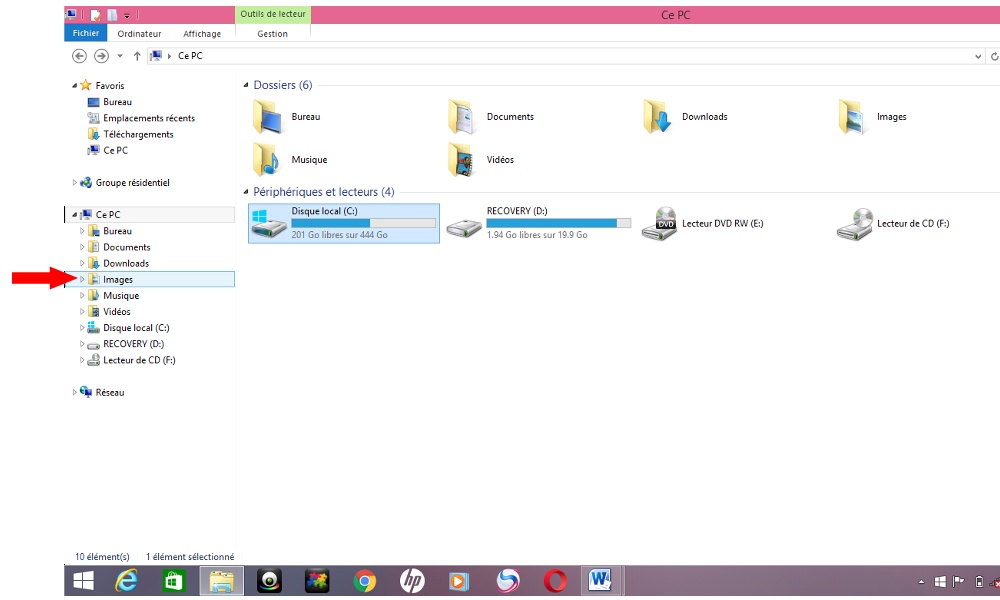
Inside the images or photos folder you will see another folder title as "screenshots", inside that folder you will see your screen-shots pictures.
HOW TO TAKE A SCREEN-SHOT USING MICROSOFT SURFACE PRO UNSING WINDOWS 10.
To take a screen-shot on a Microsoft surface pro you are to press at least three keys.
You are just to press the following keys as seen below.
You should first put your fingers on the “fn key” and “alt key” and hold still.
Then press the “space bar” button and you will automatically take your screen-shot on your Microsoft surface pro.
That is the “fn key + alt key +space bar key” and it automatically takes a screen shot, but you are to put press the first two keys first and the press the "space bar" key last.
The screen-shot images are automatically store in the Images or photos folder in your pc just as of the one above for the windows 8 and 8.1 computers. As seen below follow the red arrow.

Remember one last thing screen-shot automatically takes the present image display on your computer screen, so it is advisable to take a screen-shot with a Surface Pro when the external keyboard is connected.
Hope this piece of information was helpful.
Follow us on Twitter - @akatechsolution / @smartdevicess / @ewang_hb
Leave a Comment
"Making the simple complicated is commonplace; making the complicated simple, awesomely simple, that's creativity"
- Charles Mingus


.png)


